|
|
|
|
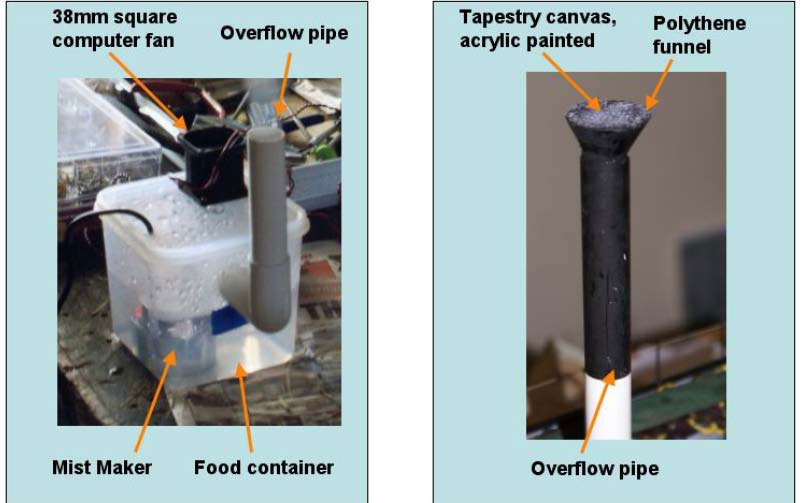
A Smoke GeneratorUpdate (February 2009)A properly engineered smoke generator, using a similar technique to that described in the article below, is now commercially available including a version in which the smoke rate is proportional to the boat speed (it incorporates an Action Electronics P68S variable speed brushless fan controller). Here is a movie of their original version in action. The generator requires 24V but relatively low amps so can be powered from a bank of NiMH rechargeables. Original Article[Peter Taylor's article reprinted from the January 2008 SRCMBC newsletter. Thanks to David J Williams for updates on Maplin prices - the spare membranes may no longer be available] When I bought Mike Hammond's build of the North Sea Herring Drifter "Peggy" I wanted to have the smoke effect featured by John Cooper's version of the same model. However, I could not get through to the suppliers on email, and I've since been told that the firm "JJC" no longer exists, so I decided to build my own. Like the JJC one, it is based on the mist generators used in indoor mist gardens.These have a membrane which vibrates at ultrasonic frequencies and throws water molecules into the air tocreate the mist effect. I used a "Mini Mist fogger" as pictured (Maplin... £19.99, as at March 2013, code L38AK). The photos below show what I came up with. 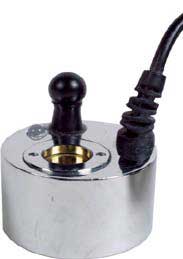 Notes for anyone wanting to do the same:(1) the mist maker is specified as 24V AC but, (and this is the by far the most important hint here), it will actually run quite happily on 24V DC, drawing 1.5 amps. I did have trouble with the 7.5A fuse which I was using, blowing sometimes (but not always) when I switched on. As a result, I use a potentiometer to apply the power less instantaneously. However I'm now almost certain that this is not needed (in any case Alan Bond suggested a better solution). If you do experience problems and follow me down the pot route always turn the pot full on straight away since small pots aren't normally designed to handle 36W! Once full on they have zero resistance and it's not a problem. For power I use two 12V, 1.2Ah lead acid batteries (in series) which gives a running time of around 1.5 hours. (2) A major problem is getting a reservoir which will fit in your model and has the required dimensions. The mist maker works best in up to 65mm water depth and switches off at 45mm depth (the depth sensor is the black chess pawn shaped thing in the picture). The maker’s body is 40mm in diameter and it uses 90ml/hr. That means if you used a pipe into which it would just fit, you would need to refill the water every 17 minutes! Also the mist maker creates a fountain of water above it, so you need to be able to position the fan away from that. All this implies that we can only fit it in larger models and that an oil based generator is the better bet for smaller models. I used a food container, but such containers are usually wide compared to deep. I now realise that the plastic containers for washing machine liquid sachets are a better shape, are free, and come in different sizes (small at the Coop, larger at Waitrose!). The mist maker membranes do wear out so it's worth buying one or two spares(Maplin: £2.49, L41AK). They come with a fitting key. (left) The prototype unit on test; (right) The final funnel assembly (3) I chose a 38mm square computer fan (£4.99, as at March 2013, Maplin code A28GU). Run at the specified 12V it instantly blew all the mist away! I now power it at 4.8V using four NiMH batteries. Computer fans usually have red, black, and yellow leads. The yellowone tells the computer how fast the fan is running as a safety measure; just cut it off. Also, because the fan has this modicum of intelligence it won't run backwards if you reverse the polarity - which is possibly a consideration in how you decide to mount it. (4) My prototype (left picture above) featured a short exhaust pipe which produced a realistic smoke effect from the funnel because there was enough room for the smoke to fill the funnel diameter. However condensation inside the funnel meant water was dripping into the model close to the propulsion motor... not a good thing. The final version of the exhaust pipe (see right hand picture above) extends nearly to the top of the model's funnel. I used a cut down polythene funnel and tapestry canvas as a "crow catcher"/smoke diffuser to get the same full diameter smoke effect. I needed about 1 square inch of the tapestry canvas so I have plenty left if someone wants a bit - but you do need to waterproof it! (5) In my Peggy I have two mist makers with independent power supplies to give twice the smoking time (or twice the smoke)! This was partly because I had the room in the food container for an extra mist maker, and also because I needed more ballast in the model. Let's face it, any ballast you use may as well be useful ballast so install more batteries! You may Smoke in this area!Here are some photos of models with different smoke units fitted. |