|
|

|
|
|
Paul Nixon's Rope Making Machine
View a movie  demonstrating the machine in use demonstrating the machine in use
|
 Over the years most of my models have been scratch built and lately my more recent ventures of a maritime nature have been no exception. However, some things have caused me some grief and one of them was paying relatively large sums of money for what appeared to be short lengths of string or thread labelled 'scale rope'. Enough was enough, so I proceeded to figure out how to make my own rope on a homemade machine. I set out a few simple criteria: a) the machine had to be powered and fully controllable; b) it had to be portable and also be small and usable in any free space in the workshop; c) constructed only from bits already to hand in the workshop; e) the rope material was to be readily available; d) produce a length of rope about 2 metres; e) and most important, I guess, teach me how rope is made. Note that I am only referring to multi stranded ropes and not plaited rope (a challenge too far)!
 In very simple and general terms, rope is made from threads of fibre, natural or synthetic, twisted together under tension to form a strand. A given number of strands, usually three, are each twisted some more while still under tension. If the tension on the individual twisted strands is released they will simply untwist. However if the twisted strands are laid against each other when the tension is released they will wrap around each other instead of untwisting, but most likely in a fearsome tangle. The point of the rope making machine is to ensure the desired number of twisted strands wrap around each other at one end of the machine, in a controlled and regulated way, at the same rate as they are being twisted up at the opposite end so forming a continuous rope of the desired length (try this demonstration!).
Rope is usually made of 3 strands and referred to as hawser laid, rope of 4 strands is called shroud laid and cable laid rope is made up of 3 or more ropes. Wire Rope is fashioned in a similar way but has a different construction.
In very simple and general terms, rope is made from threads of fibre, natural or synthetic, twisted together under tension to form a strand. A given number of strands, usually three, are each twisted some more while still under tension. If the tension on the individual twisted strands is released they will simply untwist. However if the twisted strands are laid against each other when the tension is released they will wrap around each other instead of untwisting, but most likely in a fearsome tangle. The point of the rope making machine is to ensure the desired number of twisted strands wrap around each other at one end of the machine, in a controlled and regulated way, at the same rate as they are being twisted up at the opposite end so forming a continuous rope of the desired length (try this demonstration!).
Rope is usually made of 3 strands and referred to as hawser laid, rope of 4 strands is called shroud laid and cable laid rope is made up of 3 or more ropes. Wire Rope is fashioned in a similar way but has a different construction.
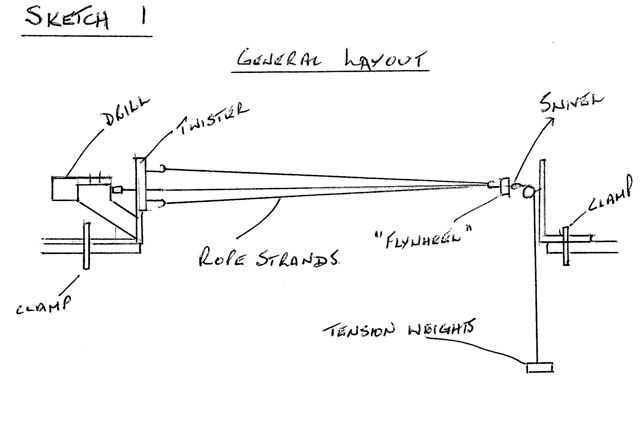
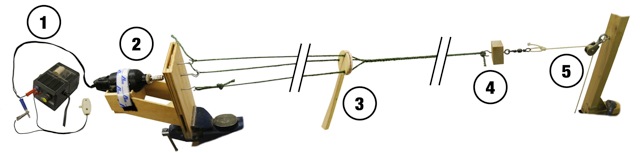
Back to the machine. I decided that the most practical power source would be my 12v Dremmel type drill; it had a transformer with a speed controller and could easily be fitted with a thumb switch. My box of clock and other bits would provide the parts for my twister, (the unit which actually twists the strands) and the opposite end would comprise just a swivel and a pulley block mounted in a plywood frame. Sketch 1 shows my initial concept and the actual setup is illustrated above (click on the figure to enlarge). Recently I've exchanged the fishing swivel for a small ball race (ex model racing car axle type).
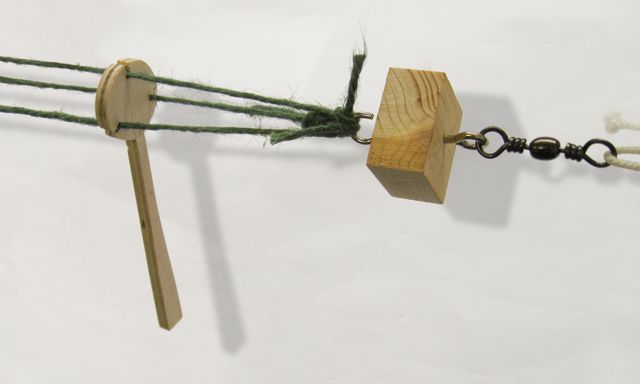
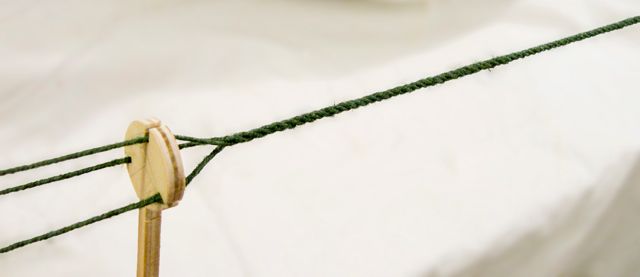
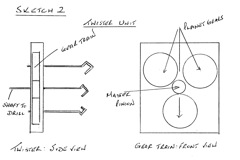 First job was to make a twister and this was done by sandwiching four gear wheels between two sheets of ply. The master drive pinion was fixed in position and engaged three larger planet gears located around it (Sketch 2). The pinion had a plain shaft fixed in it which would be inserted into the drill chuck and the other three pinions had shafts facing the other way the other ends of which were fashioned into hooks. This twister assembly was then married to a frame that held the drill unit which in turn was simply secured in it with velcro. A frame at the other end had a pulley wheel attached to it through which a rope is passed, one end of which has a weight attached to it (the tensioner) and the other end a swivel attached to small block of wood which acts a bit like a flywheel. The weight of the tensioner can be adjusted to suit the rope size required. Another item required is a 'top' which has slots in it and separates the strands as they are being twisted and will regulate the forming of the rope. In my case I use a simple piece of hand held plywood with three slots in it.
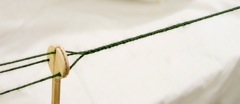
 To make the rope I clamp the twister with the mounted drill at one end of the bench and clamp the swivel at the other end of the bench about 9ft away. The strands are then strung between the twister and the hook at the swivel, in the pictured example one strand per hook, and secured. The top is then inserted between the strands at the swivel end and held there by hand (see photo). At this point the drill is started (thumb switch in hand) and twisting of the strands will start; as twisting progresses and tension increases the strands will shorten by around 25% to 30% all the while the top is held in place at the swivel end and the drill is running.
 When the tension and twists in the strands is judged sufficient move the top a little toward the twister and the flywheel should start to rotate, (it may need a kick start). If it continues to rotate keep the drill running and keep moving the top steadily toward the twister and the rope will form behind the top. When the top approaches the twister release the thumb switch to stop the drill. The rope can be released from the hooks without fear of unravelling but like any other rope it will unlay if the ends are not secured. I would suggest letting the rope 'relax' a little then use a drop of super glue on the ends to prevent unlaying.
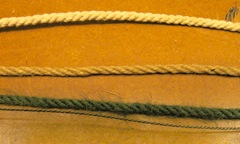
After a little practice you should have acceptable lengths of rope to your own specifications in terms of colour, material, size and numbers of strands. I have even used wire of varying types (dried flower arranger's binding wire is cheap and readily available) which looks very realistic when used as mast stays etc. I have found ordinary cotton is a bit weak and tends to break but large spools of thread can be found at car boot sales or in local haberdasher's odds and ends bin; Ebay has been another source of cotton or linen threads. The photo near the top of the page shows examples of what can be done with garden string.
|